

It isn’t all that difficult to tie a tie.


So you must tie a knot. You’ve come to the right site, so don’t worry.
Here, you will discover clear instructions and drawings that make it simple to learn how to tie every type of tie knot, whether it’s your first time or you simply need a little refresher. The Windsor, the four-in-hand, the simple knot, and even the Kelvin Knot are well-known knots that you can use.
Just take a peek below, then begin working on your technique in front of a mirror.
1. How to Tie a Windsor Knot


One of the most well-known and traditional tie knots is the Windsor Knot, sometimes known as the “Full Windsor.” It requires practice to tie the Windsor since it is larger and more symmetrical than other ties.
Because of its polished, sophisticated appearance, this knot is typically worn for formal and semi-formal situations. Additionally, it looks best with broad spread collar shirts, which are appropriate for dressier occasions.

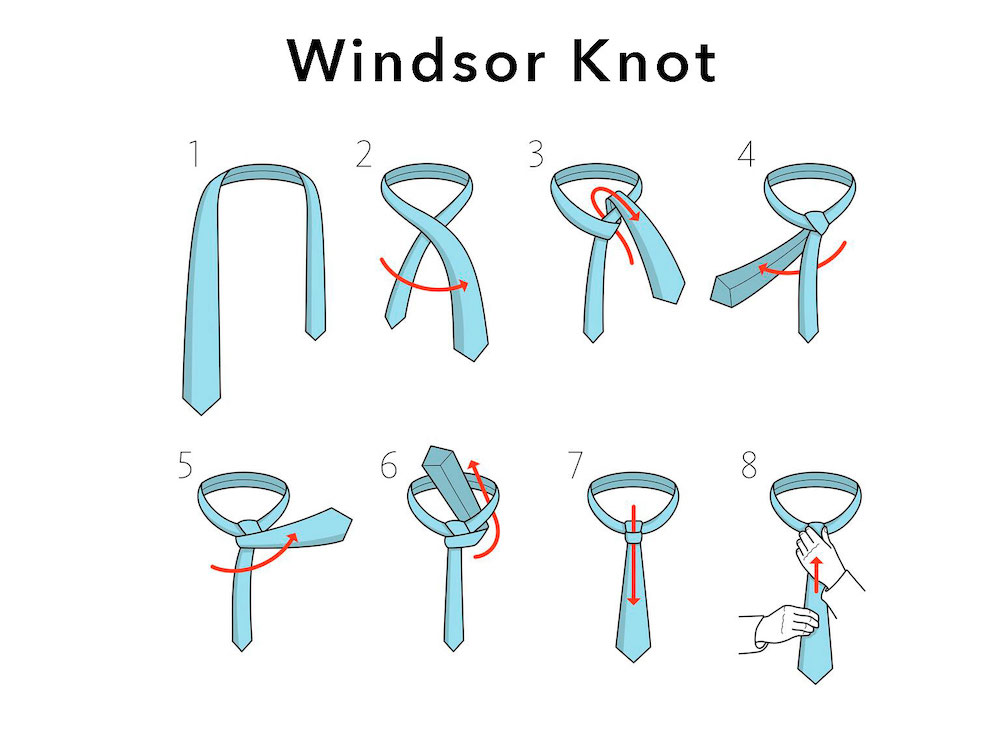
- Place the wide end on your left and the narrow end on your right.
- Cross the wide end over the narrow end.
- Pass the wide end up through the neck loop.
- Take the wide end down and to the right.
- Bring the wide end under and to the left.
- Take the wide end and bring it up and through the neck loop.
- Cross over the loop to your right to form the knot.
- Bring it up through the neck loop from below.
- Pull it through the loosened knot.
- Tighten and adjust the dimple.

2. How to Tie a Half Windsor Knot

The Half Windsor knot is incredibly adaptable. The Half Windsor knot is really closer to three-quarters the size of the Windsor knot, despite what its name might imply.
The Half Windsor is a medium-sized, virtually symmetrical knot that, when made properly, creates a considerable and deep dimple. best suited for medium- to light-weight neckties.

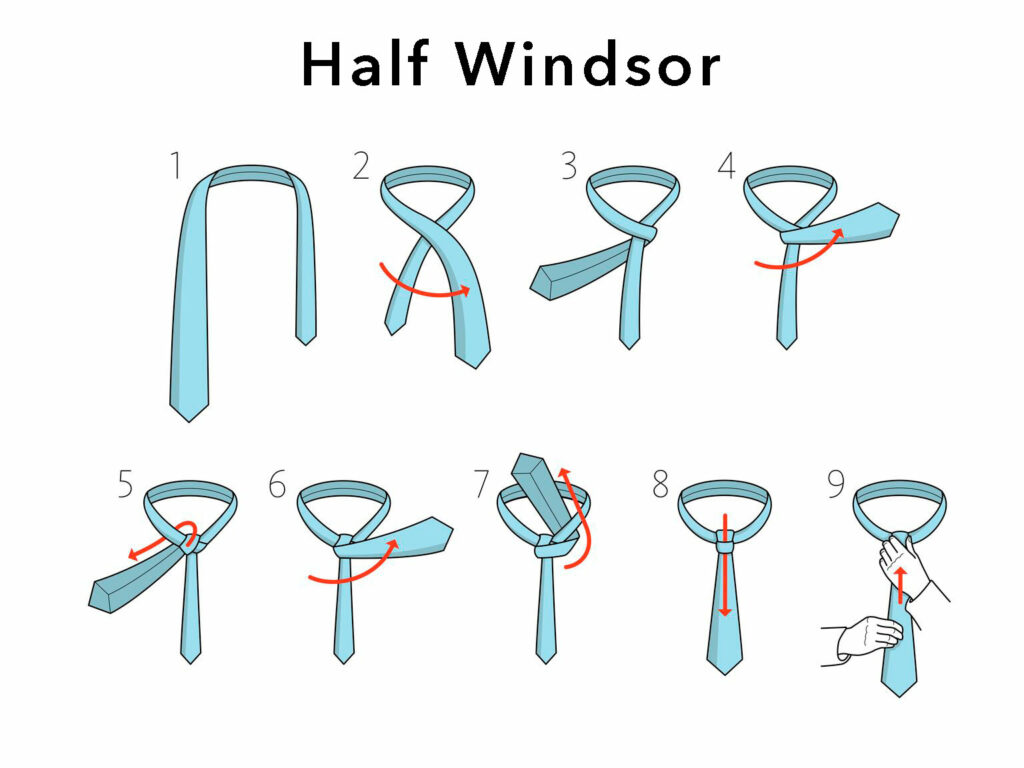
- Start again with the wider end longer.
- Cross wide end over narrow end and then back from behind.
- Bring the wide end up and through the loop down.
- Continue crossing wide end in the front to other side.
- Bring it up through the loop around the neck.
- Continue down through the front loop.
- Tighten the knot and adjust.
Tip: The wide end of the knot should have its tip level with the belt buckle after it has been tied. If it’s too long or too short, tie it again and in the first step, reposition the wide and narrow ends.

3. How to Tie a Four-in-Hand Knot

The Four-in-Hand knot should be the only one you learn.
Then why?
The Four-in-Hand knot is more fascinating since it is asymmetrical and has a narrow shape. The majority of shirt collar styles work nicely with it, and it is really easy to tie. The lone exception is a collar with a wide cut. In that situation, stick to larger knots that cover the collar.
Because the Four-in-Hand knot only uses a little portion of the tie, it is also well-liked by guys who have trouble with necktie length or ties that are too short for them (tall men, lengthy torsos, big bellies).
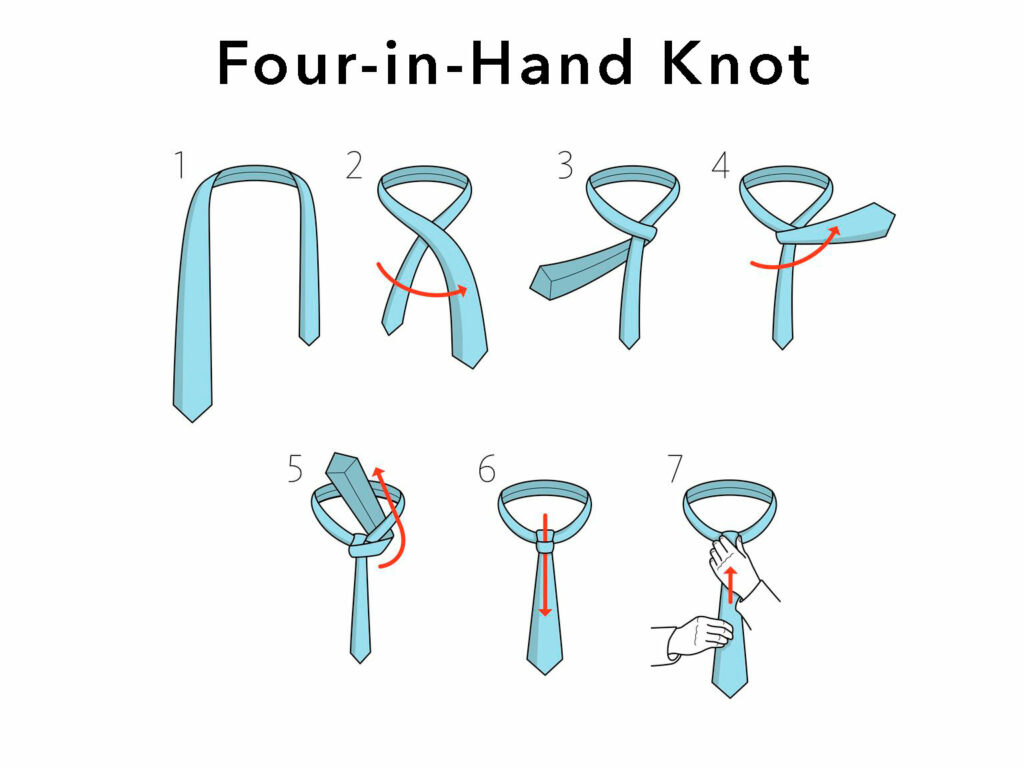
- Lay the wide end on your left and narrow end on your right.
- Cross left over right.
- Bring the wide end under and back to the left.
- Take the wide end back over once more.
- Pull the wide end up through neck loop.
- Bring it down through front loop.
- Tighten the knot and adjust the dimple.

4. How to Tie the Trinity Knot

You can advance to more complex alternatives as you become more adept at the fundamentals of tie tying. The Trinity Knot has a chic appearance based on the Trinity emblem.
The Trinity Knot is a little trickier to tie than the Windsor and four-in-hand knots because of its more intricate pattern, but it looks great at formal events.

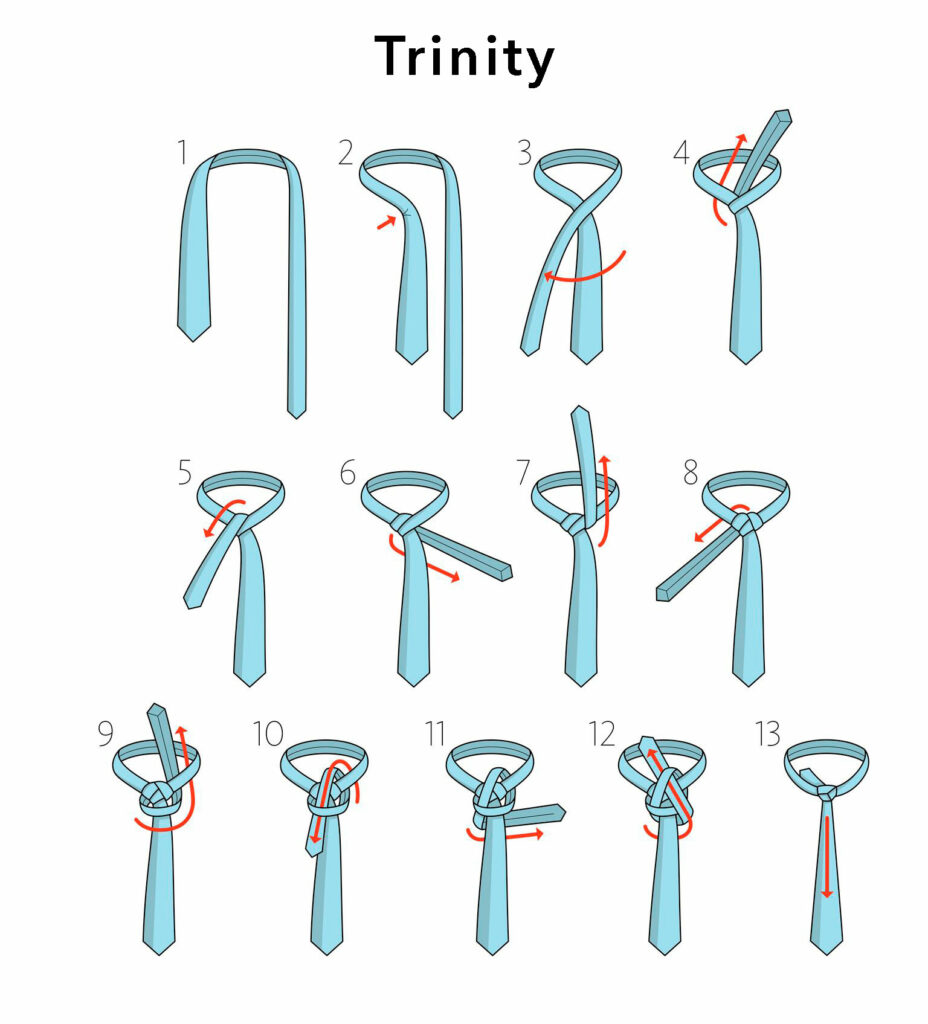
- Drape the necktie around your collar with the seam facing inward and the thick end hanging on your right where you want the finished length of the tie to be.
- Cross the narrow end diagonally in front of the thick end, making an X, and tuck it up under the loop around your neck.
- Bring the narrow end back over the top of the loop.
- Pass the narrow end horizontally behind the thick end.
- Flip the narrow end over the top of the loop around your collar.
- Feed the tip of the narrow end down and out underneath the loop around your neck, on the far right side of the knot.
- Bring the narrow end horizontally across the front of the knot from right to left. Slip a finger underneath the horizontal band this creates.
- Bring the narrow end up underneath the loop around your collar and down through the horizontal band. Slide a finger underneath the narrow end just above the knot.
- Pass the narrow end around behind the thick end from right to left.
- Feed the tip of the narrow end up over the loop around your collar and through the small vertical loop you reserved in Step 8.
- Pull the narrow end all the way through the vertical loop, still angling diagonally upward and to your right, and snug it down.
- Pull all the slack out of the knot and adjust as necessary to make the three visible folds identical in size and angle. Hide the narrow end either behind the thick end or under the loop around your collar.

5. How to Tie the Pratt Knot

The Pratt Knot, often referred to as the Shelby Knot, gives any dress shirt a fashionable appearance. This knot works effectively with light to medium-weight ties because it is thinner than the Windsor knot. To learn the Pratt Knot, follow a few straightforward steps.
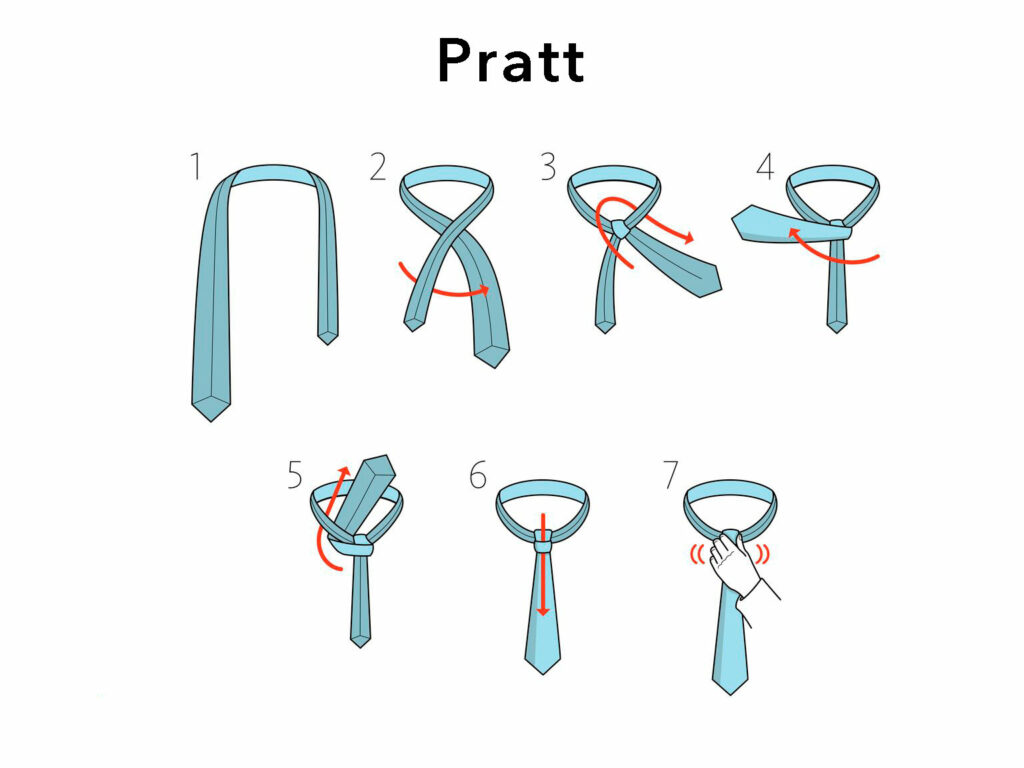
- To begin tying the Pratt knot, raise the shirt collar and drape the tie wrong side up with the wide end hanging on the right side roughly 12 inches lower than the narrow end.
- Cross the wide part of the tie under the narrow part.
- Bring the wide end up and loop it down through the opening at the neck and tighten.
- Cross the wide end to the right with the correct side up.
- Pull it up through the neck opening.
- Bring it down through the knot loop.
- Slide and adjust the knot gently and lower the shirt collar to complete the process.

6. How to Tie a Kelvin Knot

The Kelvin Knot is named after Lord Kelvin, a 19th-century mathematical physicist. It results in a tidy knot resembling the Four-in-Hand Knot. In essence, it only requires one more turn than the Four-in-Hand in order to become more symmetrical and adaptable.
The Kelvin Knot is as versatile as they come, making it ideal for both your workweek outfits and formal attire. When you’re pressed for time, we advise wearing it for a quick and put-together appearance. When used with heavier fabrics, it produces a look that is much more strong.

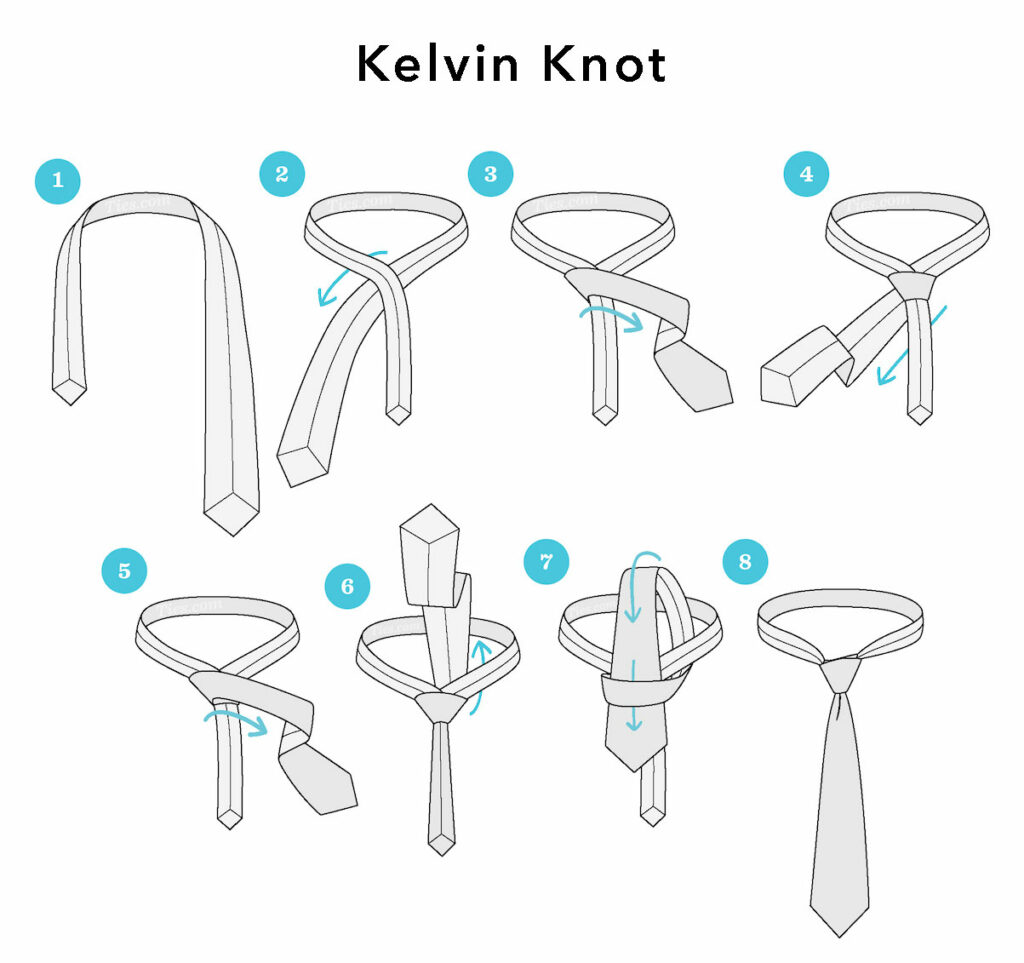
- Start with the backside of the tie facing away from you, the wide end is on the right and the small end is on the left. The tip of the small end should rest slightly above your belly-button (this will vary depending on your height and the length & thickness of your tie). Move only the active (wide) end.
- Wide end under the small end to the left.
- Across the small end to the right.
- Under the small end to the left.
- Across the small end to the right.
- Up into the neck loop from underneath.
- Down through the loop you’ve just made in the front.
- Pull down on the wide end to tighten. Slide the knot up to adjust.

7. How to Tie an Eldredge Knot
The Eldridge requires 17 different steps and is an unconventional, challenging, and eye-catching necktie knot. Jeffrey Eldredge created it in 2007, and in 2008, it became well-known online.
The Eldredge Knot is made by employing the tiny end as the active end, in contrast to the great majority of tie knots. When finished, the little end is tucked below the collar of the shirt.
The Windsor-sized knot has a huge circumference and resembles a tapered fishtail braid. This knot should be worn with caution because it is not for the weak of heart.

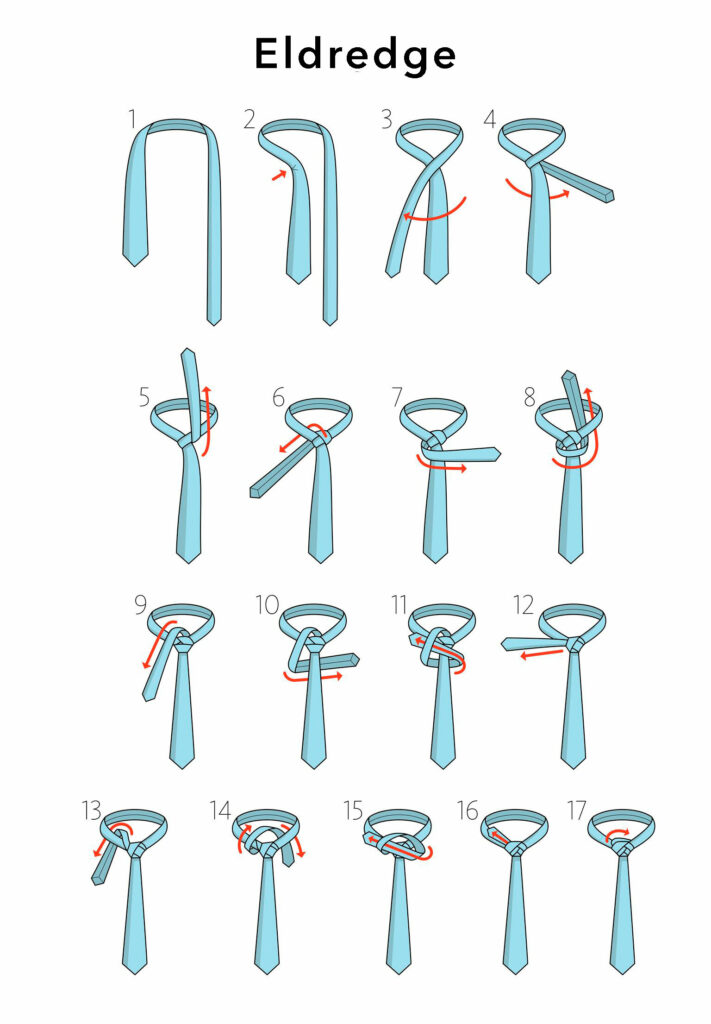
- To begin tying the Eldredge knot, raise the shirt collar and drape the tie so the wide end lays on the right side just below the navel.
- Pinch the thicker side of the tie near the collar to create a dimple long ways.
- Bring the thin part over the thick part of the tie.
- Bring the thin part under the thick part of the tie, wrong side up.
- Bring the thin part up toward the neck.
- Bring it down through the neck loop to the right, wrong side up.
- Going left, take it around the front of the knot.
- Take it up through the neck loop.
- Bring it back down to the right.
- Take it behind the wide part of the tie to the left, wrong side up.
- Take it across the front to the right and through the loop created in the previous step.
- Tighten the knot by pulling the narrow end to the right.
- Bring the end straight up and through the neck loop to the right of the knot.
- Again, bring it up, over the knot to the left of the knot.
- Keeping the knot loose, bring the short tail up to the right and through the loop just created.
- Pull to tighten.
- Tuck the end behind the neckline on the left. Lower the shirt collar for a smart and finished look.

Final Thoughts
When learning to tie knots, patience is the most important thing to keep in mind. It will always take a few tries before you feel confident.
Our recommendation: Although you probably have a preference for one tie knot, think about learning all three so you can switch up your style. For big occasions, reserve a Windsor; for casual gatherings, go for the Four-in-Hand. We’ve got all the bases covered by selecting these three tie knots.
Another thing to keep in mind is that specific knots complement your facial shape. For instance, the Four-in-Hand knot, which is smaller, works best for rounder faces, but the Windsor or Half Windsor knot, which is wider, works better for slimmer faces.